[Download] Pixamoon – Bitmap Tracking Resizing v2.05.02 for 3ds Max
![[Download] Pixamoon - Bitmap Tracking Resizing v2.05.02 for 3ds Max](https://3dmaxfarsi.com/wp-content/uploads/2026/07/bitmap-tracking-resizing.webp "[Download] Pixamoon - Bitmap Tracking Resizing v2.05.02 for 3ds Max 1")
🚀 Download Pixamoon – Bitmap Tracking Resizing v2.05.02 for 3ds Max (Full Guide & Tutorial)
Are you tired of losing your textures every time you move a project? 😫 Does the thought of manually relinking hundreds of missing files make you want to slam your head on the desk? I have been there, my friend. But those dark days are officially over.
Today, we are diving deep into one of the most life-saving scripts in the 3ds Max universe: Pixamoon Bitmap Tracking Resizing v2.05.02. This is not just a script; it is your personal assistant, librarian, and digital janitor rolled into one. Let’s explore what this beast can do and how to master it so you can get back to the fun part—creating beautiful art. ✨
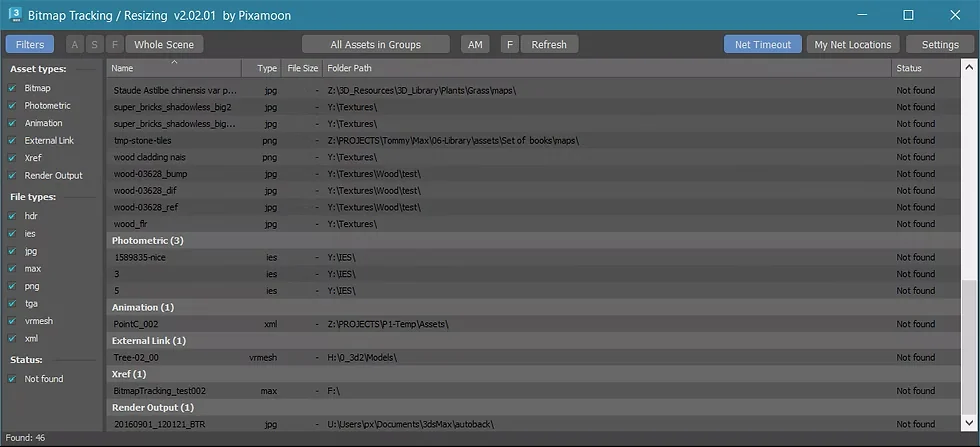
Pixamoon – Bitmap Tracking Resizing v2.05.02 for 3ds Max
This content is restricted to paid subscribers
🔍 What is Pixamoon Bitmap Tracking Resizing?
In simple terms, this is an advanced tool designed to manage every single asset in your 3ds Max scene. Whether you are dealing with missing textures, huge 8K maps that are slowing down your viewport, or need to package a project for a render farm, this script handles it all.
Version 2.05.02 is an absolute powerhouse. It works with almost every major renderer you can think of, including VRay, Corona, FStorm, Arnold, RedShift, and Octane. It is not just for simple JPEGs either; it handles IFL sequences, UDIM tiles, and even XML PointCache files. It is the Swiss Army knife you didn’t know you needed. 🔧
📚 The Ultimate Tutorial: How to Master Bitmap Tracking / Resizing
Let’s break down the main features based on the technical headings. I will walk you through how to use them like a pro, keeping it simple and fun.
🖼️ Bitmap Tracking / Resizing: General Support
First things first, this tool sees everything. No matter what kind of asset is hiding in your scene, the main interface gives you a clean, spreadsheet-like view of it. You can instantly spot what is missing, what is stored locally, and what is safely on the network. This universal support is the foundation for all the magic we are about to do.
🖥️ Resize Selected Bitmaps (2K, 1K, 512px & More)
Is your scene crawling because someone gave you 100 uncompressed 8K textures of a pebble? 🐌 Let’s fix that. With the “Resize” function, you can batch-select those massive bitmaps and shrink them down to standard sizes like 2K, 1K, 512, 256, 128, or even 64 pixels for tiny icons. The best part? It saves the resized versions in a brand new folder, so your original high-res masters stay safe and untouched. Workflow saver!
🗂️ Sort Files Like a Boss
Data chaos is the enemy of productivity. The script allows you to instantly sort your asset list by:
-
File Name
-
Image Width & Height
-
File Size
-
Full Path
-
Gamma Settings
-
Texture Name
-
Status (Found on Network, Found Locally, or the dreaded “Not Found” 🚩)
Just click the column header, and boom—everything is perfectly organized. Finding that one rogue 10MB texture in a sea of 2K maps has never been easier.
🔗 Auto-Relink Missing Assets
The holy grail! If you open a scene and see a rainbow of missing textures, do not panic. Hit the Auto-Relink button. The script will automatically hunt for those missing files based on the stored paths and reconnect them. It is like having a bloodhound that only sniffs out pixels. 🐶
✏️ Change & Rename Paths
Sometimes you don’t just need to find a file; you need to point the entire scene to a completely new location. This feature is a life-saver for team environments. You get several clever ways to do this:
-
Choose from History: Just pick a previously used path.
-
Pick a New Path: Browse to the new master folder.
-
Rename Paths Beginning: This is genius. Let’s say you need to change a drive letter from
C:\toZ:\for a render farm. You just type those in, and it updates every single asset using that drive. -
Find and Replace: A classic, powerful text replacement for any part of the path string.
🔎 Select Objects by Bitmaps
Ever wondered, “Which object in this massive architectural scene is using this ugly, blurry texture?” Wonder no more. Just select the bitmap in the list, and use this command. The offending (or brilliant) object will be instantly selected in your viewport. It’s like a game of hide-and-seek where you always win. 😉
🎨 Select & Show Materials
This is a little different. Rather than selecting objects, this function grabs all the materials that are using your selected bitmaps and loads them directly into the Material Library browser. You can then examine them, tweak them, or drag them onto new objects without having to open the full Slate Material Editor and hunt around. Elegant and efficient.
📋 Copy & Collect Assets (Project Archiving)
This is mission-critical for anyone sending scenes to a farm or a colleague. The script offers incredibly powerful collection methods:
-
Copy Local to Network: This will auto-copy files and replace paths for network rendering. Absolute gold. 🥇
-
Copy to One Path: Flattens everything into a single folder and relinks it. Simple and clean.
-
Copy with Path Structure: This creates a neat folder structure mirroring your scene, just like the built-in “Archive” function, but with way more control.
🚦 Visual Status Checks
The script gives you a visual traffic-light system: files can be shown in three custom colors representing OK (Network), Found (Local), or Not Found. You can instantly sort by the red ones to see all missing files and fix them in a flash.
🎞️ Advanced File Support (IFL, UDIM, PointCache)
This is where the “pro” in “pro tool” comes in. It doesn’t just handle a single .jpg. It fully supports:
-
IFL Sequence Files: You can resize, convert, copy, and relink entire image sequences without breaking the animation.
-
UDIM & UVTILE Tags: Perfectly manages Mari and Mudbox multi-tile textures. The script respects the
<UDIM>and<UVTILE>tags, so your high-res creature texturing pipeline remains intact. 🦎 -
XML PointCache Files: These get the copy, collect, and relink treatment too. No asset is left behind.
🖌️ Change Gamma & Color Space
No more guesswork on color management. You can change the gamma directly on selected JPEG, BMP, GIF, TGA, and TIFF files (in Max 2014+). Even cooler, you can directly change the color space in VRayHDRI, VRayBitmap, and Arnold Image nodes. This ensures your renders are perfectly linear and physically accurate every single time.
🏷️ Rename Files (5 Powerful Methods)
Naming conventions are a religion, and this script is your high priest. You can rename files in 5 different ways:
-
Copy with New Name on HDD Only: Creates a renamed copy but leaves the scene pointing to the original.
-
Copy & Rename in Scene: Creates a copy and updates the scene path. (Most common)
-
Rename on HDD Only: Just renames the physical file. (Risky, will break the scene!)
-
Rename on HDD and in Scene: Renames the file and fixes the scene path.
-
Rename in Scene Paths Only: Perfect if you already renamed files manually and just need to relink them.
🔄 Convert to Different Formats
The conversion studio is incredible. You can batch-process bitmaps to:
-
Jpeg: For universal, lightweight diffusion maps.
-
Tiff: For a lossless standard.
-
1-Bit Tiff: A specialized format ideal for sharp, black-and-white opacity maps. No more blurry cutouts! ✂️
-
Tiled Tiff (TX) & Tiled EXR: Optimize your textures for rendering performance, especially with Arnold, by creating Mip-maps. Renders love tiled textures.
📸 Save Cropped as JPG
A unique little gem. You can interactively crop a texture right within the script and save it out as a new JPG, with full control over quality, smoothing, and even a proper linear EXR/HDRI to sRGB JPG conversion. It’s fantastic for creating quick previews or tailored textures.
🖱️ External Bitmaps Mode
Don’t even have a scene open, but need to crunch some textures? Switch to this mode. You can just drag and drop image files from your desktop into the window and perform renames, resizes, and conversions directly on them. It’s a standalone image processing panel that lives inside your 3ds Max! 🤯
💎 Final Thoughts & Licensing
The Pixamoon Bitmap Tracking Resizing tool is more than just a script; it is an essential part of a professional 3ds Max workflow. It pays for itself in the first hour of a project saved from asset-linking hell.
If you are ready to take control, you can grab a Commercial License for studio work. For individual artists and students, there is a Personal License available with a 20% discount using the code: Personal-Use-Only. And if you own an older v1.xx license, you can upgrade with an extra 20% off using the code: Upgrade-2-20.
Your activation and download info will be sent via automated email immediately after purchase, so make sure you use the right address!
Stop fighting your scene and start ruling it. Go download it, and have fun creating without the headache. Happy rendering! 🎉

![[Free] Chaos Cosmos Browser [latest version]](https://3dmaxfarsi.com/wp-content/uploads/2025/10/chaos-cosmos-browser-download-390x220.webp "[Free] Chaos Cosmos Browser [latest version] 4")
![[Download] Maxtree – Plant Models Vol 50: 3D plant models](https://3dmaxfarsi.com/wp-content/uploads/2025/01/maxtree-plant-models-vol-051-390x220.webp "[Free] Maxtree – Plant Models Vol. 51 NEW 5")
